 |
 |
|
|
|
|
|
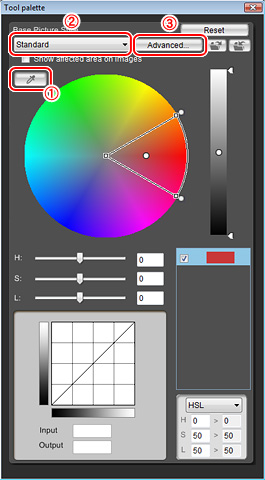
| The tool palette is fundamental to use of Picture Style Editor. Operation may seem a little complicated initially, but basically it is simple. |
|
 |
|
 |
The dropper is used when sampling colors within the image or color wheel. |
 |
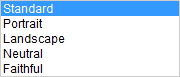
Setting of Picture Styles, which form the basis for color editing.
Photographic settings can be changed.
 |
 |
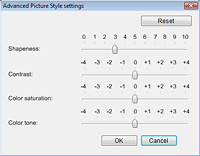
Determines the initial value for detailed settings of Picture Styles.
 |
|
|
|
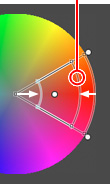
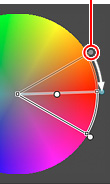
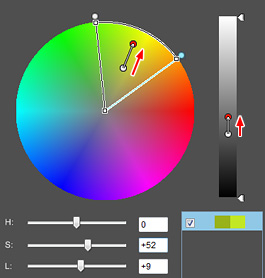
| Limit point adjustment for hue and saturation |
|
|
|
|
 |
|
 |
|
The area of influence for hue is 30º either side (total 60º), for saturation 0 - maximum point per luminosity, while for luminosity 0 - 100 is ordinarily the initial value. Each of the hue, saturation, and luminosity values can be changed freely.
The area of influence for hue can be changed from a minimum (30º) to maximum (180º) under the condition that the sample point is within the area.
The maximum value for saturation appears to run up to the outer circumference on the color wheel, but the limit point differs depending on luminosity, so it will be the maximum when luminosity = 50, and will be degraded if brighter or darker. |
|
|
|
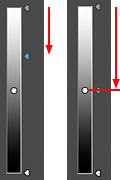
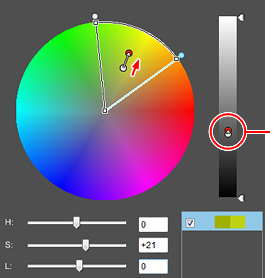
| Editing the luminosity limit point |
|
|
|
|
 |
|
The area of influence for luminosity defaults from "Minimum - maximum (0-100)" as the initial value. The upper and lower limit points can be narrowed down by up to 30 points as difference in the top and bottom provided that the sample point is not exceeded. If this factor is used, different editing can be performed even for the same color, if the luminosity is different. |
|
|
|
 |
|
 |
|
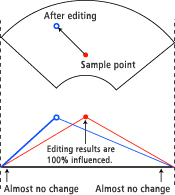
Relationship between area of influence and sample point
Even within the area of influence, the change volume specified by the slider will not be applied 100% to the area around the sample point. In terms of the color editing volume, the degree of change gradually reduces towards the periphery of the sample point, and there is no influence at all outside of the area of influence. |
|
 |
| Warning for overlapping area of influence (conflict) |
|
|
|
|
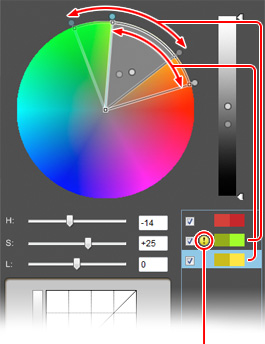
| A warning symbol is displayed on the color adjustment list intended as completion targets. |
|
|
Up to 100 sample points to be edited can be freely added. However, the same color may be affected twice or three times. If the area of influence of the edited colors is duplicated, a grey segment is shown on the color wheel and a cautionary warning is raised. Within the overlapping area, editing results for both amendments are composite. Setting must be done with great care.
Please note that warnings are also displayed for areas of influence that do not overlap in terms of luminosity although the hue and saturation are the same. |
|
|
 |
|
Tone curve is only performed once to adjust the entire tone after editing a number of colors. Up to 8 points can be added as points on the curve. Points can be specified by the mouse or as a numeric value. Color editing and tone curve have a significant mutual affect on each other, so repeated adjustment may be needed in some cases. |
|
|
|
 |
|
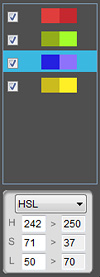
Up to 100 sample points can be added to the adjustment color list, and colors can be checked by turning on and off the effect per point. The warning symbol is displayed when areas mutually overlap.
For selected color information areas, how the sample points are edited can be confirmed from the numeric values of HSL, Lab, and RGB.
When HSL is selected, sample points can be changed by inputting numeric values. When a sample point is specified using the color wheel, luminosity is specified in this section. |
|
|
|
| Saturation limit behavior |
|
|
|
|
 |
|
Editing beyond the saturation limit
Moving the saturation (S) slider
When moving the saturation (S) slider to the right to render the saturation of the sample point more vividly, the luminosity (L) will be adjusted in sync from the mid-flow. The start point to move is the saturation limit point for the luminosity of the sample point.
In order to edit more vividly beyond the limit, it automatically changes the luminosity. |
|
|
 |
To stop at the saturation limit:
Move the (S) slider while pressing the shift key.
Normally when trying to adjust the saturation beyond the limit point, the luminosity changes in sync, but if you require the luminosity to remain unchanged, move the slider while pressing the shift key. This disconnects the link to the luminosity (L), so the saturation (S) slider stops mid-flow. Please use it appropriately depending on the purpose. |
|
|
|
|
 |
Primary function of the tool palette |
|
|
|
|
|
|
|
|
